
A theme options panel is actually a Custom Admin Page. It allows a user to change theme settings according to his taste. It comes with some of the WordPress themes. The most beneficial thing about these panels is that you don’t have to change the main theme’s actual codes. That is considered very risky for those, who don’t know much about coding.
Yes, you can change or modify the theme’s settings without changing the actual codes of the Main theme. Before going towards other options let’s talk about a built-in tool of WordPress. The name of this tool is WordPress Theme Customizer.
Theme options panel in WordPress
It is the inbuilt facility that WordPress provides us. The WordPress Theme Customizer is a separate theme options panel that is very easy to use. You can change your website’s appearance from this one place. You can change Logo, background colour, font, menus, page appearance and much more. If you are happy with these facilities then you don’t have to worry about creating a new theme options panel. If you want more then go for other tools.
But if you want to carry on with WordPress Theme Customizer than you don’t have to install or set up anything. Because it is a built-in tool for sites using WordPress.
If you want something more than this tool then, you can make your own theme panel with one of these facilities:
- Redux Framework
- Options Framework Plugin
- Fluent Framework
Redux Framework is a facility that provides you with a chance to make your own theme options panel. The good thing about this is that you don’t need to do hard coding for that. Through Redux Framework you can make your own theme options panel by just a little bit knowledge of coding. But we recommend you to take some tutorials from youtube before using redux framework for your WordPress site.
And Options Framework Plugin and Fluent Framework are also somewhat like this. If you are happy with WordPress Theme Customizer or Redux Framework then it’s ok. Or if you want some more from us than contact us in our comment section.
The Admin Screen Code
Here is the code you need to create the admin panel and include the helper function to getting the values of any setting:
<?php
/**
 * Create A Simple Theme Options Panel
 *
 */

// Exit if accessed directly
if ( ! defined( 'ABSPATH' ) ) {
	exit;
}

// Start Class
if ( ! class_exists( 'WPEX_Theme_Options' ) ) {

	class WPEX_Theme_Options {

		/**
		 * Start things up
		 *
		 * @since 1.0.0
		 */
		public function __construct() {

			// We only need to register the admin panel on the back-end
			if ( is_admin() ) {
				add_action( 'admin_menu', array( 'WPEX_Theme_Options', 'add_admin_menu' ) );
				add_action( 'admin_init', array( 'WPEX_Theme_Options', 'register_settings' ) );
			}

		}

		/**
		 * Returns all theme options
		 *
		 * @since 1.0.0
		 */
		public static function get_theme_options() {
			return get_option( 'theme_options' );
		}

		/**
		 * Returns single theme option
		 *
		 * @since 1.0.0
		 */
		public static function get_theme_option( $id ) {
			$options = self::get_theme_options();
			if ( isset( $options[$id] ) ) {
				return $options[$id];
			}
		}

		/**
		 * Add sub menu page
		 *
		 * @since 1.0.0
		 */
		public static function add_admin_menu() {
			add_menu_page(
				esc_html__( 'Theme Settings', 'text-domain' ),
				esc_html__( 'Theme Settings', 'text-domain' ),
				'manage_options',
				'theme-settings',
				array( 'WPEX_Theme_Options', 'create_admin_page' )
			);
		}

		/**
		 * Register a setting and its sanitization callback.
		 *
		 * We are only registering 1 setting so we can store all options in a single option as
		 * an array. You could, however, register a new setting for each option
		 *
		 * @since 1.0.0
		 */
		public static function register_settings() {
			register_setting( 'theme_options', 'theme_options', array( 'WPEX_Theme_Options', 'sanitize' ) );
		}

		/**
		 * Sanitization callback
		 *
		 * @since 1.0.0
		 */
		public static function sanitize( $options ) {

			// If we have options lets sanitize them
			if ( $options ) {

				// Checkbox
				if ( ! empty( $options['checkbox_example'] ) ) {
					$options['checkbox_example'] = 'on';
				} else {
					unset( $options['checkbox_example'] ); // Remove from options if not checked
				}

				// Input
				if ( ! empty( $options['input_example'] ) ) {
					$options['input_example'] = sanitize_text_field( $options['input_example'] );
				} else {
					unset( $options['input_example'] ); // Remove from options if empty
				}

				// Select
				if ( ! empty( $options['select_example'] ) ) {
					$options['select_example'] = sanitize_text_field( $options['select_example'] );
				}

			}

			// Return sanitized options
			return $options;

		}

		/**
		 * Settings page output
		 *
		 * @since 1.0.0
		 */
		public static function create_admin_page() { ?>

			<div class="wrap">

				<h1><?php esc_html_e( 'Theme Options', 'text-domain' ); ?></h1>

				<form method="post" action="options.php">

					<?php settings_fields( 'theme_options' ); ?>

					<table class="form-table wpex-custom-admin-login-table">

						<?php // Checkbox example ?>
						<tr valign="top">
							<th scope="row"><?php esc_html_e( 'Checkbox Example', 'text-domain' ); ?></th>
							<td>
								<?php $value = self::get_theme_option( 'checkbox_example' ); ?>
								<input type="checkbox" name="theme_options[checkbox_example]" <?php checked( $value, 'on' ); ?>> <?php esc_html_e( 'Checkbox example description.', 'text-domain' ); ?>
							</td>
						</tr>

						<?php // Text input example ?>
						<tr valign="top">
							<th scope="row"><?php esc_html_e( 'Input Example', 'text-domain' ); ?></th>
							<td>
								<?php $value = self::get_theme_option( 'input_example' ); ?>
								<input type="text" name="theme_options[input_example]" value="<?php echo esc_attr( $value ); ?>">
							</td>
						</tr>

						<?php // Select example ?>
						<tr valign="top" class="wpex-custom-admin-screen-background-section">
							<th scope="row"><?php esc_html_e( 'Select Example', 'text-domain' ); ?></th>
							<td>
								<?php $value = self::get_theme_option( 'select_example' ); ?>
								<select name="theme_options[select_example]">
									<?php
									$options = array(
										'1' => esc_html__( 'Option 1', 'text-domain' ),
										'2' => esc_html__( 'Option 2', 'text-domain' ),
										'3' => esc_html__( 'Option 3', 'text-domain' ),
									);
									foreach ( $options as $id => $label ) { ?>
										<option value="<?php echo esc_attr( $id ); ?>" <?php selected( $value, $id, true ); ?>>
											<?php echo strip_tags( $label ); ?>
										</option>
									<?php } ?>
								</select>
							</td>
						</tr>

					</table>

					<?php submit_button(); ?>

				</form>

			</div><!-- .wrap -->
		<?php }

	}
}
new WPEX_Theme_Options();

// Helper function to use in your theme to return a theme option value
function myprefix_get_theme_option( $id = '' ) {
	return WPEX_Theme_Options::get_theme_option( $id );
}
Using The Options In Your Theme
Using your options is very easy especially with the included helper function in the code above. Here is an example on how you would use the helper function to get and display the value for the dropdown field which has an ID of “select_example”.
$value = myprefix_get_theme_option( 'select_example' );
echo $value;
Overview of the Settings API
The Settings API is used to populate the page created by the menu item API. A settings page is divided into sections and fields.
For the sake of this tutorial, we’ll just be creating a single section and will put all the fields inside that section.
Here is the code for the theme_settings_page function to create a section and add the submit button.
function theme_settings_page()
{
?>
<div class="wrap">
<h1>Theme Panel</h1>
<form method="post" action="options.php">
<?php
settings_fields("section");
do_settings_sections("theme-options");
submit_button();
?>
</form>
</div>
<?php
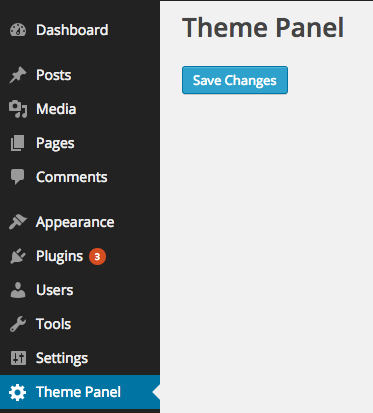
}Here we’re registering a section using settings_field with an ID section. theme-options is a group ID to all of the fields belonging to a section. Finally, the submit_button() function echoes the submit button for our theme settings page.
Here’s how that should look.
Adding Social Profile URLs
Now, let’s add fields in our settings page to store our Facebook and Twitter profile URLs. Almost every WordPress theme has social profile options, therefore it’s a handy, practical example.
Here’s the code to add input text fields using the Settings API.
function display_twitter_element()
{
	?>
    	<input type="text" name="twitter_url" id="twitter_url" value="<?php echo get_option('twitter_url'); ?>" />
    <?php
}

function display_facebook_element()
{
	?>
    	<input type="text" name="facebook_url" id="facebook_url" value="<?php echo get_option('facebook_url'); ?>" />
    <?php
}

function display_theme_panel_fields()
{
	add_settings_section("section", "All Settings", null, "theme-options");

	add_settings_field("twitter_url", "Twitter Profile Url", "display_twitter_element", "theme-options", "section");
    add_settings_field("facebook_url", "Facebook Profile Url", "display_facebook_element", "theme-options", "section");

    register_setting("section", "twitter_url");
    register_setting("section", "facebook_url");
}

add_action("admin_init", "display_theme_panel_fields");
After the admin panel is initialized, we’re registering the sections and fields display callbacks. Here we’re using three important functions:
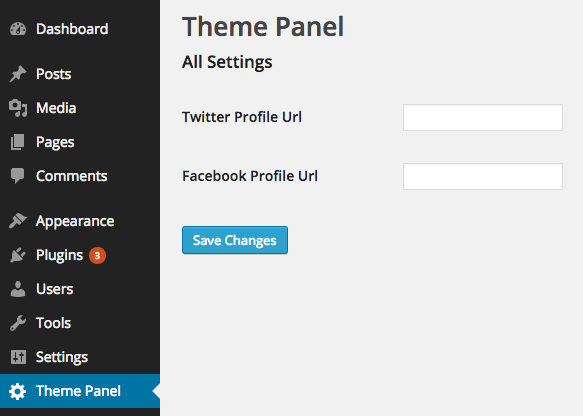
add_settings_sectionis used to display the section heading and description.add_settings_fieldis used to display the HTML code of the fields.register_settingis called to automate saving the values of the fields.
Here’s what our settings page should now look like.
We’ve now seen how to add input text fields using our settings page. Let’s see how to add a checkbox by providing an option to choose between static or responsive layouts.
Adding Option to Choose Between Layouts
Let’s see how to expand out the display_theme_panel_fields function to display a checkbox to choose between layouts.
Here’s the code to achieve this.
function display_twitter_element()
{
?>
<input type="text" name="twitter_url" id="twitter_url" value="<?php echo get_option('twitter_url'); ?>" />
<?php
}
function display_facebook_element()
{
?>
<input type="text" name="facebook_url" id="facebook_url" value="<?php echo get_option('facebook_url'); ?>" />
<?php
}
function display_layout_element()
{
?>
<input type="checkbox" name="theme_layout" value="1" <?php checked(1, get_option('theme_layout'), true); ?> />
<?php
}
function display_theme_panel_fields()
{
add_settings_section("section", "All Settings", null, "theme-options");
add_settings_field("twitter_url", "Twitter Profile Url", "display_twitter_element", "theme-options", "section");
add_settings_field("facebook_url", "Facebook Profile Url", "display_facebook_element", "theme-options", "section");
add_settings_field("theme_layout", "Do you want the layout to be responsive?", "display_layout_element", "theme-options", "section");
register_setting("section", "twitter_url");
register_setting("section", "facebook_url");
register_setting("section", "theme_layout");
}
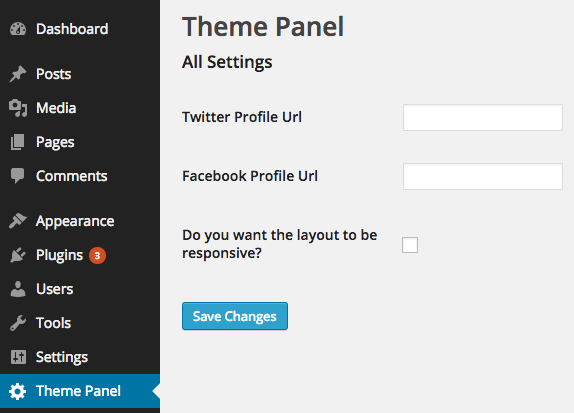
add_action("admin_init", "display_theme_panel_fields");We added a new settings field using and registered it using as usual. One thing to note, if we want to tell whether a user has checked the checkbox or not, we’re using the checked() function.
The checked() the function compares a value with another value, if they’re equal then it echoes a checked attribute, otherwise nothing.
Here’s how our settings page looks now.
Uploading a Logo
The register_setting function takes a third argument which is a callback, this callback is fired before it saves the settings into the database. We can utilise this callback to handle uploads.
Here is code to upload a logo in our settings page.
function logo_display()
{
	?>
        <input type="file" name="logo" />
        <?php echo get_option('logo'); ?>
   <?php
}

function handle_logo_upload()
{
	if(!empty($_FILES["demo-file"]["tmp_name"]))
	{
		$urls = wp_handle_upload($_FILES["logo"], array('test_form' => FALSE));
	    $temp = $urls["url"];
	    return $temp;
	}

	return $option;
}

function display_theme_panel_fields()
{
	add_settings_section("section", "All Settings", null, "theme-options");

    add_settings_field("logo", "Logo", "logo_display", "theme-options", "section");

    register_setting("section", "logo", "handle_logo_upload");
}

add_action("admin_init", "display_theme_panel_fields");
Here, we’re using wp_handle_upload to store the image file and retrieve its URL and store it as a option.
Here’s how our settings page looks now, it’s shaping up nicely!
![]()
Retrieving Settings
A theme needs to retrieve the setting values on the front end. The Settings API internally stores the values using the Options API. Therefore, you can retrieve the values using get_option() function.
It’s quite simple, here’s the code.
<?php

$layout = get_option('theme_layout');
$facebook_url = get_option('facebook_url');
$twitter_url = get_option('twitter_url');
Conclusion
In this article, we saw how we can easily create a theme settings page using the Settings API. We created a text, file and checkbox input fields to take input in various data formats. Go ahead and try to expand the page and add more form controls yourself.
